Start a WordPress website for your creative business in 5 simple steps
Now that I’ve told you Why You Should Hire a Web Designer, I’m going to step back into that new business owner mindset and realize some of you are going to do this yourself. This article will walk you through the basics of setting up your own WordPress website. Why WordPress? Read this.
Prefer SquareSpace, see my article Start a SquareSpace Website. It talks about the benefits of SquareSpace verse WordPress and how to quickly setup a new website for your creative business.
Step 1: Choose your domain name and host.
Put some thought into these, as you’ll want to stick with what you setup here. If you are just starting out, I’d suggest a shared host, such as A2 Hosting. If you don’t want to deal with WordPress updates or backups, then maybe spend a little more and go with a managed WordPress host, such as Flywheel. Setting up an account should be pretty self-explanatory and the host should help you through this part.
(Please note both of these links above are affiliate, but I only partner with businesses for affiliate programs when I truly believe in the product.)
Step 2: Install WordPress
If you have chosen a regular shared host such as A2 Hosting, Bluehost, GoDaddy or any of their competitors, you will need to install WordPress. If you chose a managed WordPress host, such as Flywheel, you can skip this step. With Flywheel, you simply login to your account and click “new site”, and the rest is done for you.
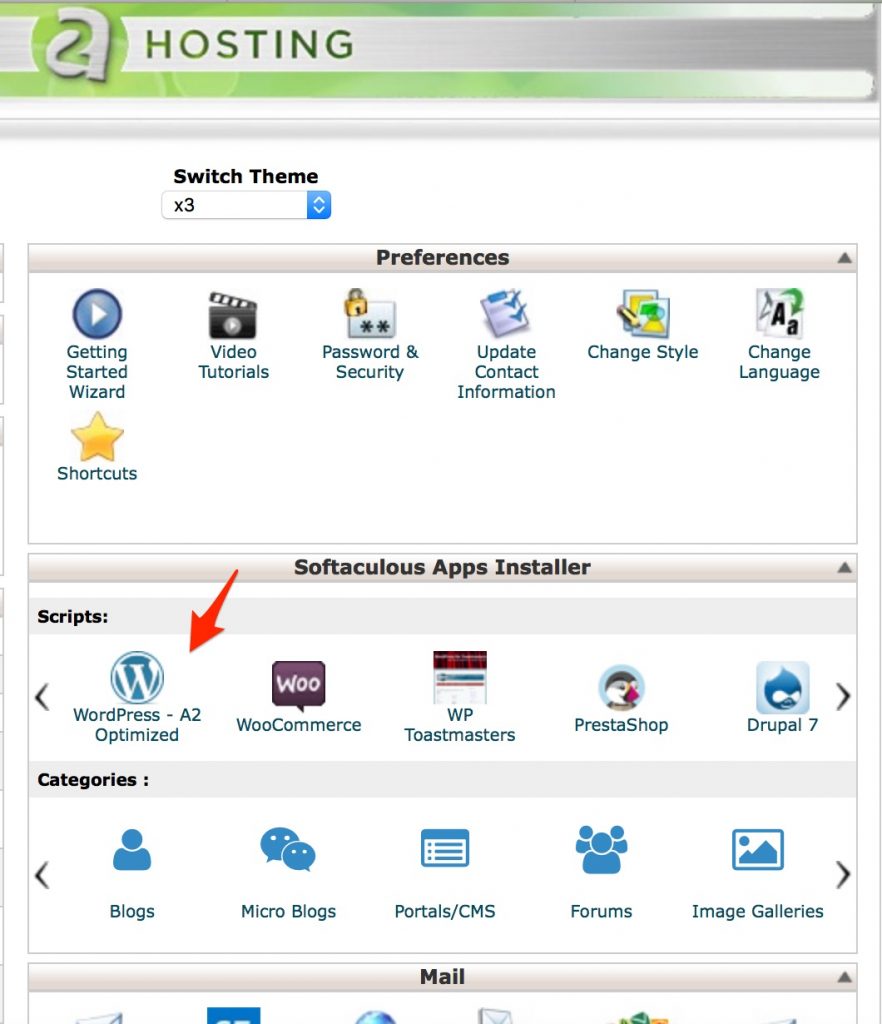
With a shared host, you login to your account and look for the cpanel. Within the cpanel, you will see Wordpress. My screenshot below shows my A2 Hosting cpanel with the arrow pointing the WordPress install. Bluehost, who I don’t recommend but only mention because they are on of the most popular hosts, looks very similar to this.

From the screen above, you’ll get to another page where you can accept the default options. Just make sure you have the right domain selected if you have more than one. Also, note the administrator account name and password. Click Install and it will do the rest for you.
Step 3: Choose a Theme
There are free WordPress themes and premium themes that will cost anywhere from $20 to $200. The theme controls the look of your website. Keep in mind that if you choose a theme that is very versatile it often uses more resources, so simply look for one that fits the look you need. In WordPress your content stays, even when you change themes, so you can do steps 4 and 5, and later change the look. For Premium themes, I’m a dedicated Genesis framework user but these are not the most user friendly to a novice.
Another note about all in one type themes. I’m using Divi on this website, which is a beautiful and versatile theme that I do recommend. However, Divi and many themes similar to it with drag and drop capabilities for building are much harder to change away from later. I plan to transfer this site to Genesis and make it more blog-like in nature, but it’s a bigger project than if I was switching from one Genesis child theme to another.
Here is a list of free WordPress themes with brief reviews of each, https://colorlib.com/wp/free-wordpress-themes/. Be sure you choose a mobile responsive theme.
You can start out like this, get something up there, get some content written and later higher a web designer to transform the look of the site. You’ll have something in the meantime, and have content that can always be used.
Once you’ve chosen a theme login to your new WordPress install. By default it will be something like www.myurl.com/wp-admin. Enter the user name and password noted in step 2. On the left, click on Appearance and Themes, and proceed with the install.
Step 4: Create and Assign a Static Home Page
If you want your website to look like mine at www.jessiemary.com utilizing a home page and blog page, you’ll have to create a new page. Actually, you’ll create at least two new pages.
From within your WordPress dashboard, on the left choose Pages. Create a page titled Home, or with a title that you’ll know is for the home page. Just leave it blank and publish. Then do the same with one as blog.
Next on the left, go to Settings and Reading. You’ll pull down the Front Page dropdown and find your page that you created as Home. Next, you’ll do the same for posts page, assigning the page called Blog. Save and you are done.
Step 5: Add content and Create a Menu
Next you’ll need to add some content to your home page, such as a welcome statement an intro to what you do. Then you’ll want to go back to Pages and Add New, to create additional pages. Typical pages include: About, Services, Pricing, Contact, and Blog. For each of these pages, type just like you would in a word processing program and use the “add media” to upload any images you’d like. Then hit publish for each page.
Once you have several pages, you’ll need to add them to your menu. In your WordPress dashboard still, go to Appearances and Menus. If one isn’t already created, click “create new menu”. Give it a name and save. On the left of this screen, you’ll see the recent pages you created, click the checkbox to add them to your menu and again save. You can drag and drop to re-order the items.
Next click on menu location and assign the menu you created to primary or secondary menu, depending on your preference. Your theme will determine where this displays.
That’s it! These are the 5 steps to starting a WordPress website. This is a very basic overview and is not going to leave you with a chic designer site, but it’s a start. For some of you, a start may be all you need if you are brand new in business. For others of you, feel free to reach out to me for a custom quote for your website design and development.


